How to Navigate Safely in Winter and Poor Visibility
Learning how to navigate safely in winter and poor visibility is essential for staying confident and in control when the hills turn white and featureless.
In SHORT…
-
How to plan effectively for poor visibility: Check mountain-specific forecasts, map out handrails and catching features, preload GPX routes, and build in realistic winter timing so you’re never caught off guard.
-
How to use the right tools and techniques: Rely on map, compass, pacing, bearings, and altimeter checks first—then use GPS as a confirmation tool rather than your primary navigation method.
-
What to consider when choosing a safe winter route: Pick ridgelines and strong features, avoid open plateaus, break the journey into short legs, and be prepared to turn back early if conditions deteriorate..
This article is part of our Winter Camping Basecamp, where you’ll find expert layering advice, technical gear deep dives and practical cold-weather tips.
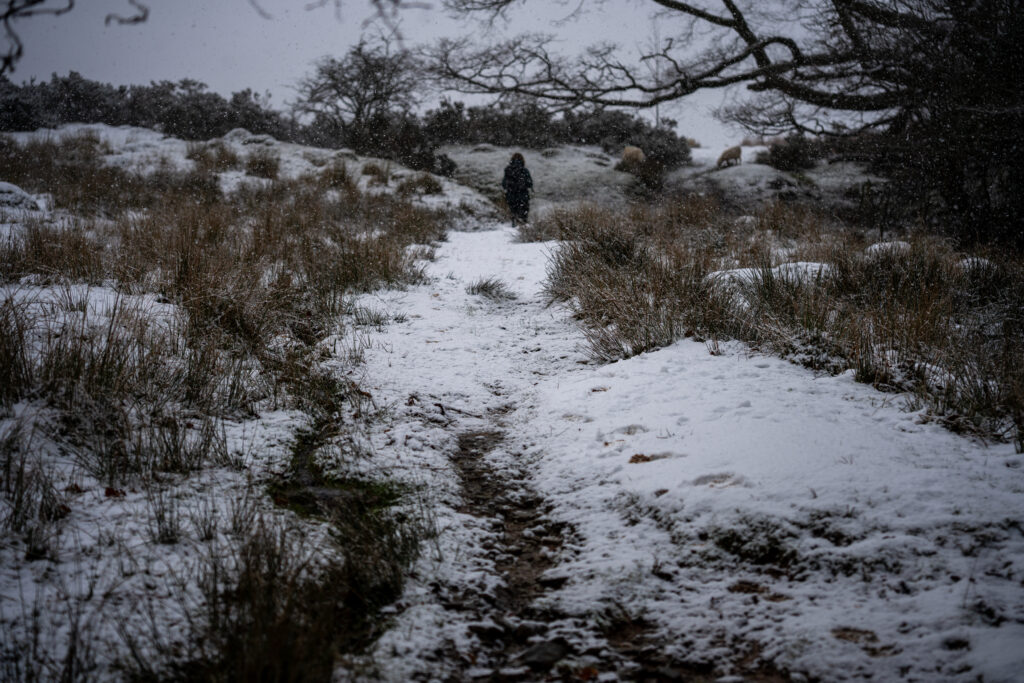
Winter in the hills can be incredible. Fresh snow, quiet valleys, and crisp air can turn a familiar route into something that feels entirely new. The same conditions that make winter special can also make it challenging. Visibility can vanish in minutes when snowfall picks up, spindrift starts to blow, clouds sink, or fog rolls across the slopes. Landmarks fade, depth perception drops, and everything begins to look the same.
In these moments, navigation is no longer about convenience; it’s your safety. Phones and GPS devices are useful tools, yet the cold temperature drains batteries quickly, and the signal can be unreliable. Confidence in your map, compass, and preparation is what keeps the day on track. This guide will walk you through how to plan, choose the right tools, and move with purpose when the winter world turns white and featureless.
At Trekitt, we always urge you to head into winter conditions only if you have the right skills, experience, and preparation to do so safely. Winter hills can be unforgiving, and even a short route can become serious when the weather turns. Our local Mountain Rescue teams are absolute heroes—volunteers who give up their time, day and night—but they’re already stretched, especially through the colder months. Please don’t add to their callouts because a forecast wasn’t checked or a plan wasn’t in place. Know your limits, build your skills, and choose the days that set you up for success.
1. Understand What Happens to Visibility in Winter
Winter transforms the landscape and alters how you perceive it. When visibility drops, it is usually due to one of a few predictable conditions:
Whiteouts
A whiteout happens when the sky and the ground blend into one flat, featureless surface. There is no contrast, no shadows, and nothing to focus your eyes on. It becomes difficult to determine whether the ground is rising, falling, or shifting. This is disorienting even for experienced winter walkers.
Blowing Snow or Spindrift
Strong wind can pick up loose snow and throw it across your field of vision. This moving white curtain makes distance and shape harder to judge. It can also make your world feel smaller and more enclosed.
Low Cloud or Hill Fog
The cloud that sits on the hill can cut visibility down to a few metres. Landmarks you rely on in summer simply vanish. Even large features, such as ridgelines, become vague shapes.
Snow Cover Hiding Navigation Aids
Paths, cairns, trail markers, re-entrants, and even small streams can disappear under snow. The landscape becomes smoother and less defined. Features you normally use to confirm position may no longer be visible.
The key point is straightforward: a route that feels simple in summer or autumn can feel unfamiliar and confusing once the snow settles. Familiarity is not a guarantee of safety when the visual cues are gone. This is why winter navigation depends on preparation, steady technique, and the ability to trust your tools.
2. Start With the Right Planning Before You Go
Good navigation begins long before you set foot on the hill. Winter demands more preparation because conditions can change fast and visibility can disappear without warning. A clear plan reduces stress and helps you make confident choices if things become challenging.
Check Mountain Weather Forecasts
Use mountain-specific forecasts such as MWIS or the Met Office mountain forecast. Look closely at:
- Cloud base, which tells you when you might be walking in thick mist
- Wind speed, which affects blowing snow and comfort
- Freezing level and recent snowfall
- Visibility predictions and expected precipitation
If the forecast suggests poor visibility, build that assumption into your plan from the start.
Preload GPS Tracks and Bailout Options
Download your main route as a GPX, along with one or two safe alternatives. Bailout routes should follow clear features like a valley floor, a long ridge, or a track. Having them ready means you are not improvising under pressure.
Identify Handrails and Catching Features
Look at your map and mark:
- Handrails such as fence lines, streams, spurs, or ridges that can guide your movement
- Catching features such as a saddle, stream junction, contour change, or path crossing that tell you when to stop or change direction
These are the features that keep you oriented when everything around you looks the same.
Set Realistic Timing Using Naismith’s Rule
Naismith’s Rule offers a simple way to estimate how long a leg of the journey will take:
- Plan for 1 hour per 5 km
- Add 10 minutes for every 100 m of ascent
Snow slows movement. Your stride shortens, your footing becomes less certain, and navigation checks take longer. Adjust your pace expectations in winter:
- Add extra time per kilometre when moving through snow
- Slow the pace for steeper ground
- Expect descents on snow to take longer, not less
Your aim is not to calculate a perfect number. You are creating a rough but reliable time reference. When your estimated time and actual time align, it confirms your position. When they do not, it alerts you to stop and reassess early, before errors compound.
A solid winter plan does not remove the challenge of poor visibility. It gives you the confidence to keep moving with purpose, even when the landscape becomes quiet, white, and unfamiliar.
3. Tools You Should Carry
Carrying the right tools is essential, but knowing how to use them is what actually gets you home. Winter navigation relies on a combination of analogue reliability and digital convenience. One should back up the other, rather than replace it.
| Tool | Why it Matters |
| Map (OS or Harvey) | A physical map will not lose battery, freeze, or drop signal. It is your core reference. |
| Compass | Allows you to take and follow bearings when there is nothing to see around you. Vital in whiteout conditions. |
| Altimeter Watch | Confirms your height on the slope. When everything is white and featureless, knowing your elevation is a key position check. |
| GPS Device or Phone App | Excellent for confirming your location and tracking your progress. However, it should assist your navigation, not replace it. |
| Power Bank and Insulated Phone Pouch | Cold drains batteries quickly. Keeping your electronics warm and powered means they remain useful when needed. |
The goal is redundancy. Rely on both analogue and digital navigation, not one or the other. A map and compass give you a dependable foundation. GPS and phone apps offer quick verification and confidence checks. If one system fails, the other keeps your day safe and under control.
4. Essential Techniques for Poor Visibility
When visibility drops, you are no longer navigating by what you can see. You are navigating by what you know. These techniques allow you to move with purpose even when the landscape around you feels blank.
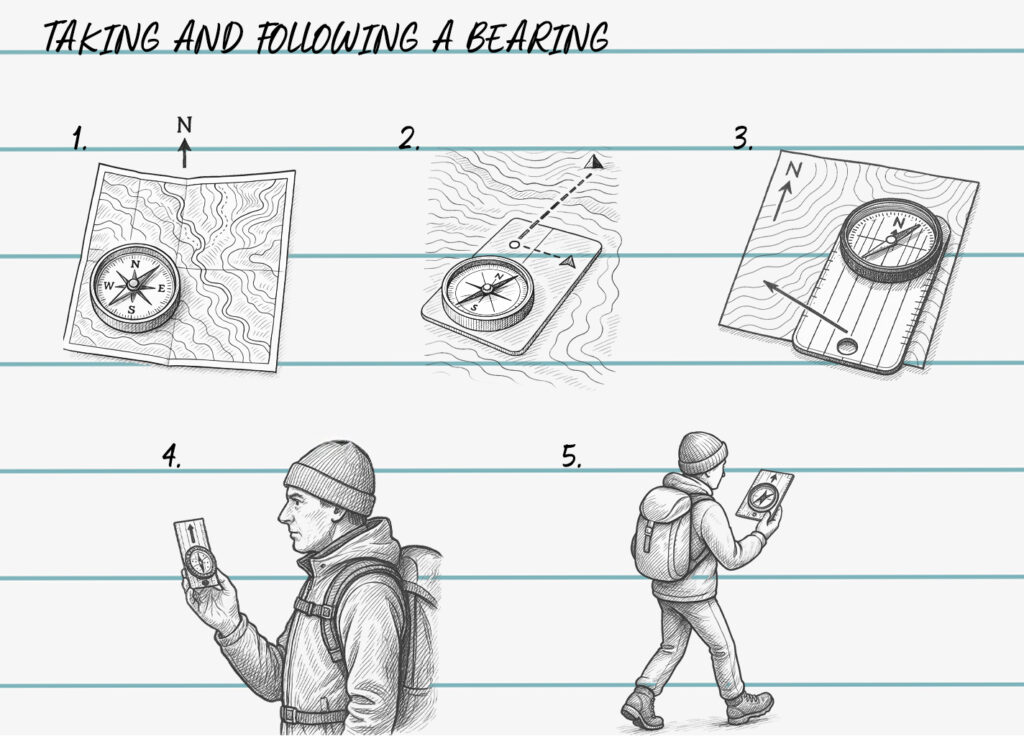
Taking and Following a Bearing
A bearing is your direction of travel. When the ground and sky merge, a bearing becomes your path.
- Orient your map so it matches the terrain (map north to real north).
- Place your compass on the map between your current point and your next target.
- Rotate the compass housing to align the orienting lines with the north lines on the map.
- Lift the compass, turn your body until the needle aligns with the housing.
- Keep the compass close, look at the direction-of-travel arrow, and walk in that line.
The key is to trust the compass, not what you think the land is doing. In a whiteout, your eyes deceive you. The compass does not.
Pacing and Timing
Pacing is counting your steps to measure distance. Start by working out how many paces it takes you to walk 100 metres on flat ground. On snow, expect your stride to shorten, so pace counts will be higher. Timing works alongside pacing. If a leg should take 12 minutes and you have been walking for 18, it is a signal to stop and reassess your position. These checks keep you on track even when you cannot see anything useful around you.
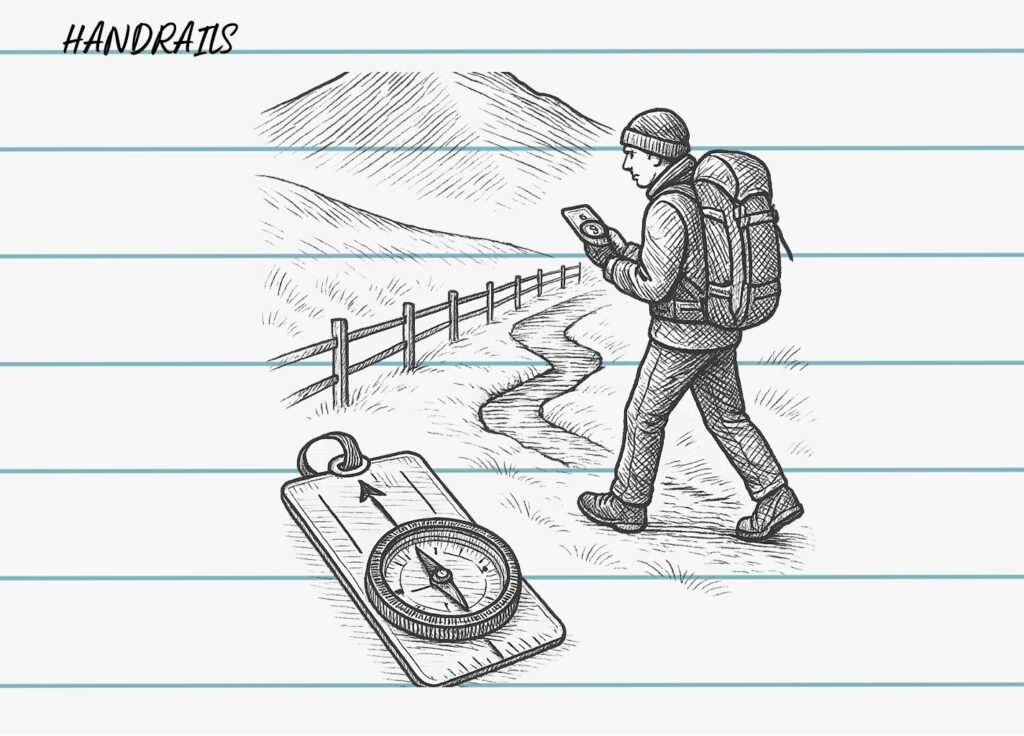
Handrails
A handrail is a feature you can follow like a guide.
Examples:
- Fence or wall
- Stream
- Spur or ridge edge
- Track or forest boundary
Handrails give you structure. They help you move confidently from one point to the next. When visibility is poor, choose routes that feature strong handrails wherever possible.
Catching Features
A catching feature is something on the map that tells you when to stop or change direction. It prevents you from overshooting.
Examples:
- Stream crossing
- Small summit
- Saddle or change in slope angle
- Junction in paths or tracks
Think of catching features as your brakes. They keep your progress controlled and intentional.
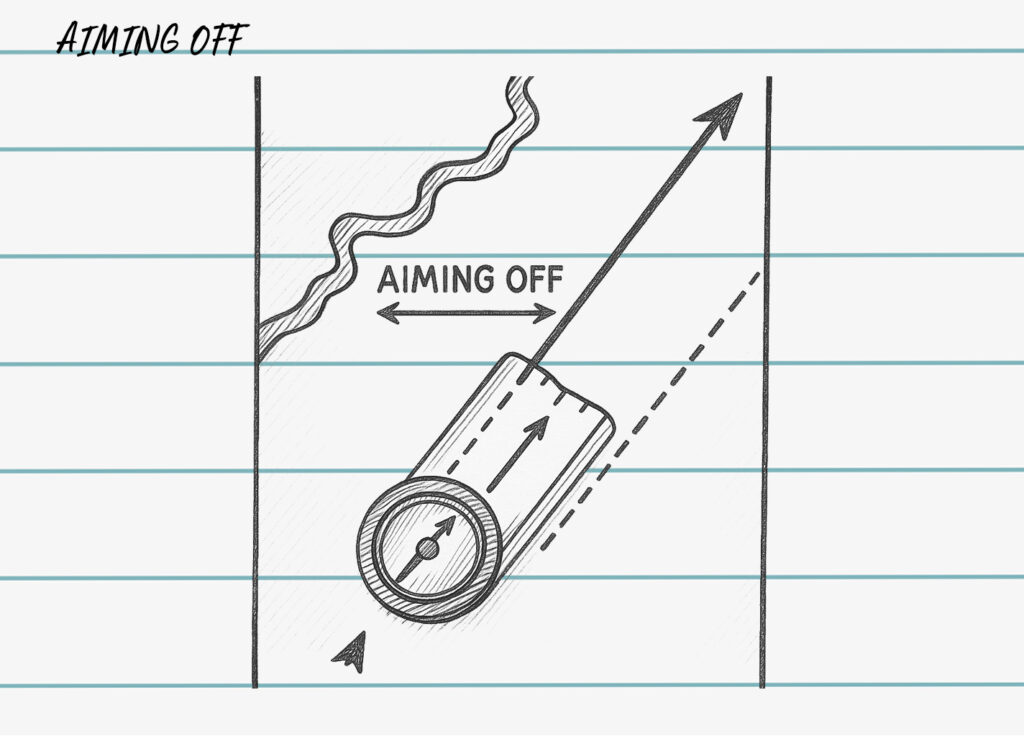
Aiming Off
Aiming off is a simple technique that stops you from wandering around looking for a feature. If you need to reach a stream junction, for example, deliberately aim to one side of it rather than trying to hit it perfectly in the middle. When you reach the stream, you instantly know which direction to turn to reach the junction.
Example:
You are walking toward a stream that runs north to south, and the bridge you need is somewhere along it. If you aim directly for the bridge and miss, you do not know whether to turn left or right on the bank. If you aim slightly to the north of the bridge, when you hit the stream you know to turn south. This removes uncertainty and prevents wasted time.
5. Route Choice: Keep It Conservative
Route choice is where judgment really matters. In winter and poor visibility, the simplest route is often the safest one. You are aiming for clarity, not challenge.
Avoid Featureless Ground
Large plateaus or broad open slopes can feel like walking inside a blank sheet of paper during a whiteout. There are no shapes to guide you, and few catching features to stop you drifting offline. If you can, plan to avoid these areas when visibility is uncertain.
Favour Ridgelines Over Basins
Ridges tend to have more precise shape and direction, even when covered in snow. Basins and bowls can feel disorienting and often contain terrain traps or deep drifts. A ridge gives you a natural handrail and usually a more predictable line of travel.
Choose Routes with Strong Features
Select routes with streams, fences, clear spurs, or marked path sections. These features make it easier to confirm your location and your destination. The more reference points you have, the more confident your navigation will feel.
Know When to Turn Back
Turning around early is a wise decision, not a failure. If you reach a point where you are unsure of your location, the safest move is to stop, reassess, and consider retreat. Winter rewards clear thinking, not stubbornness.
Good winter navigation is not about heroics. It is about steady, thoughtful movement on the ground, you understand. When you choose routes that are easy to follow and easy to correct, you create more space for confidence, enjoyment, and safety.
6. When Tech Helps (And When It Doesn’t)
GPS devices and navigation apps are genuinely useful in winter. They offer quick confirmation of your location and help reduce uncertainty when visibility is low. Used well, they support your navigation rather than dominate it.
When GPS Helps
- Confirming that you are on your planned line
- Checking your progress between navigation points
- Locating yourself quickly in a whiteout
This reassurance can make a significant difference in boosting confidence under challenging conditions.
Where GPS Falls Short
- It does not show how steep the ground feels underfoot
- It cannot judge snow conditions or avalanche risk
- It encourages people to follow a line blindly rather than read the landscape
A GPS can tell you where you are. It cannot tell you what the terrain is doing or whether it is safe to continue. That judgement must come from your map, your experience, and the conditions in front of you.
Offline Maps and Cold Protection
Always download offline maps before you go. The signal is unreliable in the hills. Keep your phone or GPS device warm by storing it inside your jacket or using an insulated pouch. Cold drains batteries fast, so carry a power bank to recharge if needed.
Technology is an excellent backup and a strong confidence check, but it should not replace the core skills of map reading, compass navigation, and decision-making. The strongest approach is always a combination of analogue and digital, working together.
7. Realistic Winter Navigation Practice
Navigation is a practical skill. The more you use it, the more natural it becomes. Confidence does not come from reading about navigation; it comes from doing it in controlled situations before you need it in challenging ones.
Practice in Low-Stakes Conditions
Head out to a familiar local hill in mist, at dusk, or on a cloudy day. Take bearings and follow them even when you think you already know the way. This teaches you to trust the compass rather than your assumptions.
Consider a Navigation Course
A good winter navigation course will teach structure, not tricks. It gives you a chance to learn from experienced instructors, ask questions, and practise techniques with guidance.
Start Small in Winter
Choose shorter, simpler winter routes before committing to long ridges or summits. Build up gradually. Winter navigation is often slower and more tiring, so small successes build confidence without pressure.
The most important thing to remember is that navigation is a skill that can be learned. No one is naturally “good at it”. Every experienced winter walker has made mistakes, corrected them, and learned from the experience through repetition. With practice, the white, quiet hillside will feel far less intimidating and far more manageable.
8. Checklist Before You Set Off
A quick, simple reference you can screenshot and use each time.
- Map and compass
- GPS or phone app with offline maps downloaded
- Power bank and insulated phone pouch
- Warm layers, waterproof shell, gloves, and face protection
- Headtorch with spare batteries
- Primary route + clearly planned bailout options
- Someone at home knows your plan and expected return time
Taking a few seconds to check this list before you leave can save you hours of stress later.
9. Extra Tips for Confident Winter Navigation
Use your poles as sighting markers
When following a bearing, place one pole ahead in line with the direction of travel. Walk to it, repeat. This reduces the temptation to drift left or right.
Do a location check at every decision point
Any time you stop at a junction, slope break, or feature, quickly confirm:
- Where you are
- Where you’re going next
- How long the next leg should take
This prevents small errors becoming big ones.
Write key information on your map case
Note bearings, distances, times, and catching features for each leg. Having this visible on the outside removes faff and keeps you moving efficiently in cold conditions.
Keep your compass where you can reach it easily
If the compass is buried deep in a pocket, you’ll be reluctant to use it. Keep it on a lanyard around your neck or clipped to a chest pocket.
Travel in smaller steps rather than big leaps
In poor visibility, break the journey into short, manageable legs between handrails or catching features. This maintains confidence and stops you from wandering off course.
Check your shadow or wind direction when visible
Even in winter, wind direction is often more noticeable than terrain. If you know the wind is blowing from the west, use it as a subtle orientation backup.
Stop before you’re unsure
If something feels off, pause early. A short moment of assessment is far easier than correcting a full navigation error later.
Final Word
Navigating in winter is not just about avoiding problems. When you know how to move confidently through poor visibility, the hills become more accessible, not less. You gain calm, clarity, and control, even when the world around you turns white. These skills open up more good days out, more often. They aren’t about being perfect. They’re about being prepared and knowing when to turn back if conditions make safe navigation impossible.
FAQ
Use a compass bearing and follow it carefully. In a whiteout, your depth perception disappears and the landscape provides no reference points. Trust the compass rather than what your eyes suggest. Combine this with pacing and timing to track distance, and use handrails or catching features where possible.![]()
GPS is a useful confirmation tool, but it should not be your only method. Batteries drain quickly in cold conditions, and GPS cannot show terrain hazards or help with judgement. Always carry a map and a compass and know how to use them.![]()
Pacing is still reliable in snow, but your steps will be shorter, so pace counts will be higher. Practise pacing in winter terrain so you learn your adjusted stride. Combine pacing with timing and altimeter checks for stronger accuracy.![]()
Both OS and Harvey maps work well. Harvey maps often show terrain shape more clearly, which can help in whiteout conditions, while OS maps offer more detailed human-made features. Choose whichever you are most comfortable reading.![]()
Keep your phone inside your jacket or in an insulated pouch. Avoid opening it unnecessarily, as the temperature change can accelerate battery drain. Carry a power bank and short charging cable that can be used with gloves on.![]()
Stop moving immediately. Find a safe spot to stand out of the wind. Re-establish your location by checking your last known point, using your altimeter to confirm elevation, and identifying handrails or catching features. If uncertain, use your bailout route to retreat rather than pushing on.![]()
Choose shorter routes with strong handrails, clear ridgelines, and well-defined features. Avoid open plateaus and complex terrain. Build confidence gradually before attempting longer or more exposed routes.![]()
Not necessarily, but a good course can accelerate learning and boost confidence. It provides structured practice and feedback that is difficult to replicate on one’s own. If you feel hesitant in poor visibility, a course can make a noticeable difference.![]()
Leave a Reply