Reducing condensation in a tent during winter starts with understanding why moisture builds up in cold conditions, and this blog breaks down the key factors behind it while showing you the most effective ways to keep your shelter drier and more comfortable. Below is a quick overview of what you’ll learn:
In SHORT…
-
What causes winter tent condensation: How cold temperatures, damp ground, and still air create the perfect environment for moisture to form inside your shelter.
-
How to manage and reduce condensation: Practical steps like improving ventilation, managing moisture sources, and choosing a smart pitch location.
-
Which setups work best in winter: Why double-wall tents, good airflow, and thoughtful gear management make the biggest difference in keeping your sleeping area dry.
This article is part of our Winter Camping Basecamp, where you’ll find expert layering advice, technical gear deep dives and practical cold-weather tips.
If you’ve ever woken up in your tent on a cold morning, wondering why the inside feels like a rainforest, you’re not alone. Condensation is one of the most common winter camping frustrations — and no matter how experienced you are, it still manages to sneak in.
In winter, the issue only gets worse. You’re breathing out warm, moist air all night while the tent fabric is freezing cold on the other side. Add in damp ground, snow, and still air, and suddenly your cosy shelter becomes a moisture magnet. The result? Drippy walls, a damp sleeping bag, and gear that feels like it’s been lightly misted.
And that matters more than just comfort. Excess moisture can sap heat from your sleeping bag, reduce insulation performance, and leave your kit wet going into the next day, which isn’t ideal when temperatures are hovering around zero.
The good news? You don’t have to just accept it. While you can’t banish condensation completely (no tent can!), you can massively reduce it with a few smart tricks. The rest of this guide walks you through how to keep your winter nights drier, warmer, and a whole lot more enjoyable.
What Causes Condensation in a Tent in Cold Weather?
Before we dive into the fixes, it helps to understand what’s actually going on inside your tent. Condensation isn’t a tent “fault” — it’s just basic physics doing its thing.

Warm, moist air + cold tent fabric = instant condensation
Every time you breathe, you release warm, moist air. The same story applies if you’re cooking a meal, drying damp gloves, or just settling into your sleeping bag after a long day out. All that moisture rises and hits the inside of your cold tent fly… and the moment that warm air meets the colder fabric, it turns into tiny droplets of water.
In summer, this still happens — just less dramatically. But in winter, the temperature difference is so extreme that it takes almost no time for moisture to cling to the walls.
Winter brings even more moisture into the mix
A few cold-weather conditions make the problem worse:
- Snow and saturated ground: Cold, wet surfaces radiate moisture all night long.
- Still, calm air: Great for a peaceful camp, not so great for airflow — the moisture has nowhere to go.
- Freezing temperatures: The tent fabric cools down rapidly, giving moisture the perfect surface to cling to.
Condensation vs. Frost: What’s the Difference?
You might notice that sometimes your inner tent is wet… and sometimes it looks like someone sprinkled sugar all over it.
Here’s what’s happening:
- Internal condensation is the liquid water forming on the inside of your fly or (in single-wall tents) directly on the inner surface.
- External frost or ice forms outside the flysheet, often overnight, when moisture in the air freezes onto the cold outer fabric.
Both are normal. Both are unavoidable in winter. And both can break your spirit when you pack up in the morning — but with the right setup, you can keep most of that moisture away from you and your sleeping bag.

Ventilation: Your Best Defence
It feels completely wrong, doesn’t it? You’re tucked up in your tent on a freezing night, and every instinct tells you to seal it shut like a Tupperware container. But that’s actually the worst thing you can do.
Why Ventilation Matters in Winter
Allowing cold air in when you’re trying to stay warm may seem counterintuitive, but when it comes to condensation, humidity management always beats heat retention.
A sealed tent traps:
- Warm, moist breath
- Steam from cooking
- Dampness from your clothes
- Body heat from you, your partner, or your dog
Without anywhere to escape, all that moisture heads straight to the coldest surface it can find — usually the flysheet — and condenses instantly. A little airflow helps move that humid air out before it becomes droplets.
Good ventilation doesn’t make your tent “cold”; it helps prevent your sleeping bag and kit from getting wet, which ultimately keeps you warmer.
Practical Ventilation Strategies
1. Use your tent’s vents — yes, even in winter
Most tents are designed with high and low vents that work together to create airflow. Open them up. You don’t need them wide open — even a small opening makes a big difference.
2. Crack the door zip
You can unzip the top of your fly door a couple of centimetres to let warm air rise and escape. If your inner tent has a mesh panel, leave that partially open too.
3. Keep your gear clear of airflow paths
Backpacks, boots, jackets, and stuff sacks can block vents or reduce circulation. Keep corners and vent areas uncluttered.
4. Don’t cook inside the tent
A stove adds a surprising amount of moisture in minutes. If you absolutely have to cook under a shelter, do it in the vestibule with the outer door wide open.
5. Air the tent before you sleep
A quick 30–60 second blast of fresh air before you get in your sleeping bag helps disperse the warm, humid air that has built up while you set up camp.
6. Air it again in the morning
Before packing up, open all vents and doors for a moment to allow everything to dry slightly. This reduces the amount of moisture that gets trapped inside your pack.
Site Selection: Where You Pitch Makes a Big Difference
Ventilation is half the battle — but the other half happens before you’ve even unpacked your tent. Winter camping makes location especially important because cold air and moisture behave very differently in winter than in summer.
A smart pitch location can dramatically reduce condensation. A poor one can turn your tent into a damp, greenhouse-like environment.
Avoid Moisture Traps
Some places are basically condensation factories. They might look sheltered and cosy, but they collect cold, humid air that lingers all through the night.
Stay out of valleys, dips, and basins
Cold air sinks. Always.
If you pitch in a dip, you’ll end up sleeping in a natural bowl full of chilled, moist air. Even a small hollow can make a big difference.
Don’t camp right next to lakes, rivers, or streams
They may look pretty (and convenient), but they constantly pump out moisture — even when partially frozen.
Winter rule of thumb:
If it reflects the sky, it adds humidity.
Pitch at least 50 metres away from water when possible.
Choose Spots with Gentle Air Movement
Your perfect winter pitch has one thing: a light breeze, not a gale, and not total stillness.
Look for areas with natural airflow
A tiny bit of moving air helps carry humid air away from your tent. You don’t need wind — just enough air movement to prevent a stagnant microclimate around your shelter.
Sheltered, but not sealed off
Forest alcoves, tight hollows, and deep snow pockets can feel safe, but they trap moisture.
Aim for:
- Hillside shoulders
- Open stands of trees
- Slightly raised ground
- Areas with a “window” for air to pass through
This keeps you protected without completely cutting off ventilation.
Ground Conditions Matter (More Than Most People Think)
What you pitch on has a surprising effect on how much moisture ends up inside the tent.
Snow, saturated turf, and frost all release moisture
Cold surfaces radiate dampness upwards.
This moisture then gets trapped between the groundsheet and inner tent, adding to humidity.
This is why even with perfect ventilation, you can wake up to a wet flysheet if the surface below you is damp.
Use a footprint — it helps, but don’t rely on it alone
A footprint:
- Adds a barrier against cold, wet ground
- Protects your tent floor
- Reduces contact with standing moisture
But it won’t eliminate moisture entirely. Think of it as insulation, not a moisture shield.
Tip: Don’t tuck the footprint up under the tent edges — it can block airflow and trap humidity.
Avoid pitching in thick vegetation.
Grass hummocks, heather, long moss — they can look cushy, but they hold a huge amount of moisture and release it slowly overnight.
If you have a choice, go for:
- Firm, compacted snow
- Short grass
- Bare ground (if winter conditions allow)
- Rock slabs (with appropriate anchoring)
These surfaces release less humidity than spongy vegetation.
Tent Choice: Why Double-Wall Designs Win in Winter
Even with perfect ventilation and a smart pitch, the tent itself plays a significant role in determining how much condensation you’ll encounter. And when it comes to winter camping, the classic double-wall design is your best friend.
How Double-Wall Tents Reduce Condensation
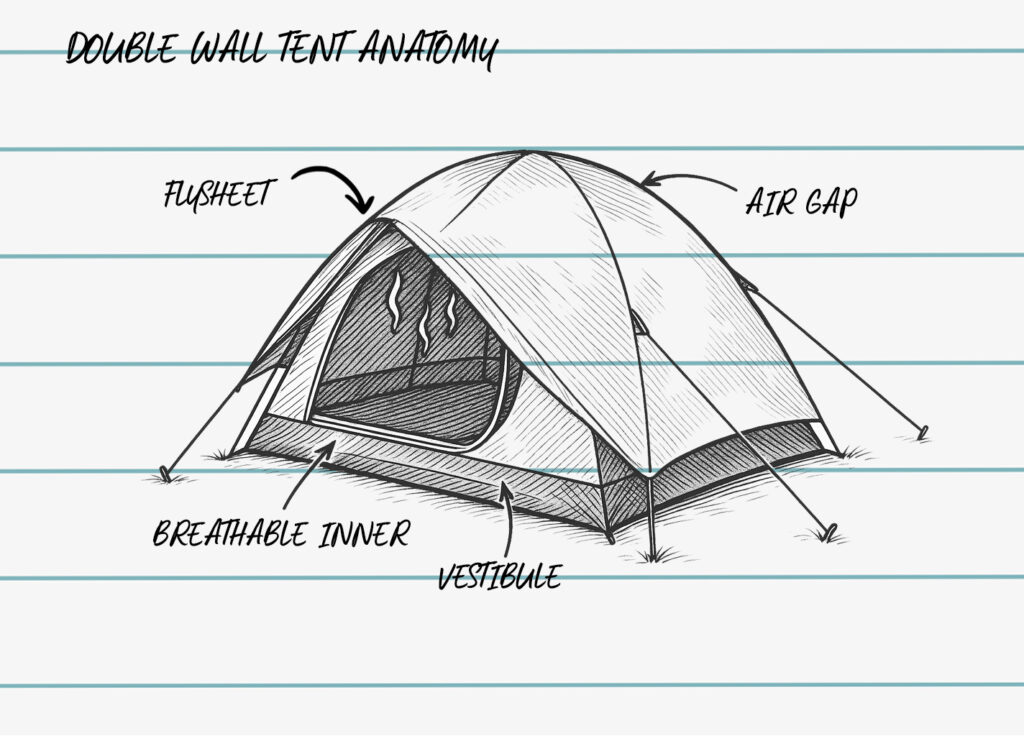
A double-wall tent uses two layers: a breathable inner tent and a separate flysheet. This design does a lot of the hard work for you.
Breathable inner + protective fly
The inner tent allows moist air to escape through it rather than collect directly on the fabric you’re sleeping next to. Meanwhile, the flysheet takes the hit — that’s where condensation usually forms.
The air gap is your secret weapon
Between the inner and outer tent is a small pocket of air.
This gap:
- Slows down the transfer of cold
- Helps moisture move upward and out
- Prevents condensation from touching the inner walls
It’s simple physics, but incredibly effective.
Better venting, less dripping
Most double-wall tents come with multiple vents, higher-volume ceilings, and vestibules — all features that help moisture escape instead of re-entering your sleeping bag.
In short: a good double-wall tent doesn’t stop condensation from forming — it stops it from reaching you.
When Single-Wall Tents Are (and Aren’t) Suitable
Single-wall tents are appealing because they’re lighter, simpler, and often quicker to pitch. But in winter, they’re a bit of a gamble.
Where single-wall tents shine
They’re brilliant in:
- High-altitude alpine environments
- Extremely dry, cold climates
- Fast-and-light missions where weight matters
- Snowy conditions with consistent airflow
In these environments, the air is so dry and temperatures are so stable that condensation becomes less of an issue.
Where they struggle
Single-wall shelters are not ideal for humid winter conditions, especially:
- Low-level UK valleys
- Coastal areas
- Damp woodland
- Mixed weather fronts
- Days with wet ground, sleet, or thawing snow
With no breathable inner and no air gap, condensation forms directly over your head, and you’ll feel every drip.
Unless you’re heading into a dry alpine zone or carrying a specialist mountaineering tent, a double-wall design is almost always the better choice for winter backpacking.
Features to Look For in a Winter Tent
If you’re picking or upgrading your shelter for colder months, look for features that directly help manage moisture.

Large adjustable vents
Winter tents should offer high and low venting options so you can tune airflow without letting in too much wind or snow.
Fly-to-ground clearance or adjustable snow skirts
A small gap at the bottom of the flysheet allows air to circulate underneath.
If you’re using a tent with snow skirts, look for ones that can be lifted or secured open in mild conditions.
Roomy vestibules
Having a big porch area means:
- Wet kit stays out of the main tent
- You can cook safely with ventilation
- You have space to shake off frost before entering the inner tent
The less moisture inside, the better.
A taut pitch is essential
Sagging fabric:
- Reduces airflow
- Collects droplets
- Touches the inner tent
- Transfers moisture back onto your sleeping bag
Winter tents are designed to be tensioned well — make sure yours is pitched drum-tight, especially in snowy or frosty conditions.
Additional Tips to Minimise Condensation
Once you’ve sorted ventilation, site selection, and the right tent, these smaller habits can make a huge difference. Winter camping is all about managing moisture — the less you create and the more you move out of the tent, the drier (and warmer) you’ll stay.
Store wet gear in the vestibule
Anything damp — such as jackets, boots, gaiters, and gloves — should be kept outside the sleeping area. The vestibule is there for a reason. The less moisture inside the inner tent, the less you’ll find on the walls by morning.
Avoid drying clothes inside the tent
It’s tempting to warm up socks or gloves overnight, but all that moisture has to go somewhere — and it usually ends up on the flysheet. If something is soaked, keep it in a drybag inside the vestibule or hang it where airflow is better.
Use a footprint, but let the edges breathe
A footprint adds warmth and protects your tent floor, but don’t tuck it up under the walls. That creates a bathtub effect that blocks low-level airflow and traps dampness underneath the tent.
Keep your sleeping bag away from tent walls
Even with excellent airflow, a little moisture can gather on the inner tent walls. Make sure your sleeping bag’s loft doesn’t touch the sides, as the insulation — can still absorb dampness and reduce overall warmth.
Use a microfibre towel for wiping walls
A lightweight microfibre cloth is one of the best winter camping tools. Use it in the morning — or even during the night — to wipe down the flysheet or inner wall. It weighs next to nothing and prevents drips.
Air out your sleeping bag and jacket in the morning
Down and synthetic insulation naturally accumulate a bit of moisture overnight. Before packing away, give them a quick airing outside the tent to keep them performing at their best.
Manage body heat properly (avoid overheating)
If you overdress in your sleeping bag, you’re more likely to sweat — and that moisture goes straight into the tent environment. Wear just enough to feel comfortable. Your sleeping bag does the insulating.
Ventilate during snowfall
If snow begins to build up against the flysheet, it blocks airflow. Clear it when you can. Snow drift can silently seal the lower edges of the tent, trapping humid air and increasing condensation.
Keep snow from piling against the fly
Snow pressed against the flysheet adds cold, damp insulation and blocks the airflow gap you need. Before bed, clear a ring around your tent. In heavy snow, check again if it’s safe to do so.
Don’t bury the fly unless you absolutely need to
Using snow to anchor the flysheet is great in high winds, but terrible for condensation. If you don’t need the stability, leave a small gap at ground level and anchor the tent with guylines instead.
Build snow walls with airflow in mind
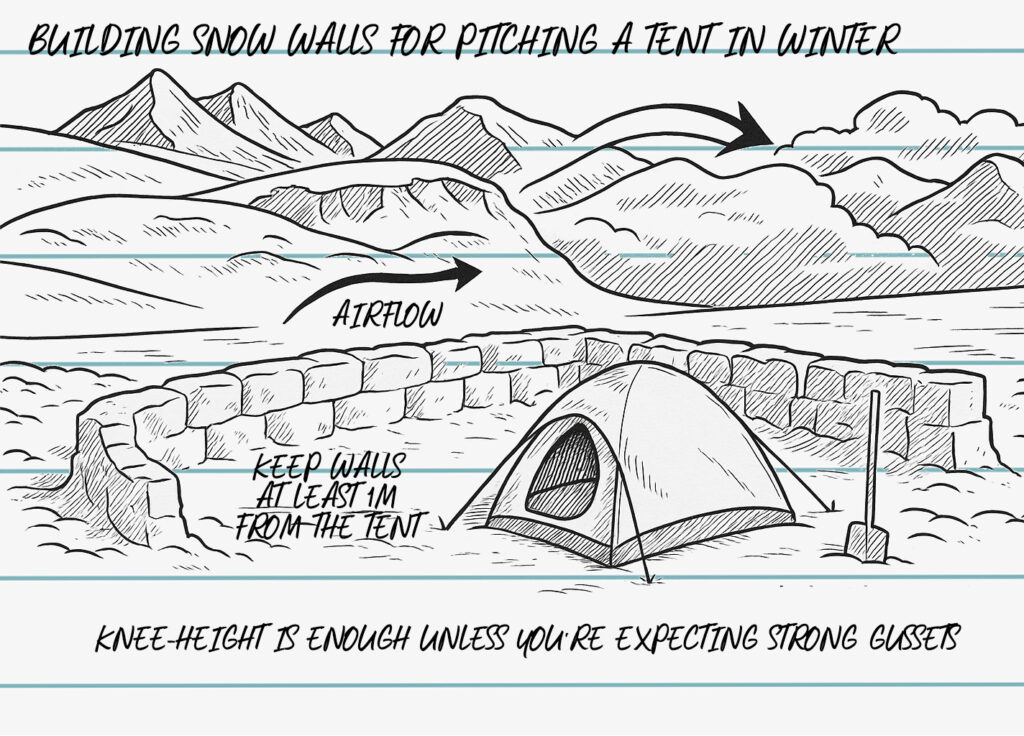
A low snow wall can shield you from wind, but place it too close and you choke airflow.
- Keep snow walls at least 1 metre from the tent
- Knee-height is enough unless you’re expecting strong gusts
This gives shelter without creating a moist microclimate around your tent.
Compact deep snow before pitching
Pitching directly on fluffy, uncompacted snow traps pockets of warm air underneath you. As that heat rises, it condenses rapidly on the fly.
To reduce it:
- Stamp out a firm platform
- Let it harden for 10–20 minutes
- Pitch once the surface is solid
A firm base radiates far less moisture.
Avoid pitching immediately after fresh snowfall
Fresh snow contains a huge amount of surface moisture. If you set up straight on top of it, the ground will radiate dampness upward all night.
Where possible, scrape down to firmer snow or clear a small area for your footprint.
Keep vents clear of frost
Frost can clog vents from the inside, especially in single-wall tents. Give them a gentle tap or wipe to keep the airflow moving.
Shake frost off the fly before it melts
Morning sunlight or body heat will melt frost into water droplets — right onto your sleeping bag. Before opening the door, step outside and give the flysheet a firm shake to knock the ice off while it’s still solid.
Condensation vs Leaks: How to Tell the Difference
It’s extremely common for campers to assume their tent is leaking when they wake up to damp walls or drops of water on their sleeping bag. However, in winter, condensation is almost always the culprit — not a failure in waterproofing.
Here’s how to tell the difference.
Signs it’s condensation (most common scenario)
- Moisture appears even when it hasn’t rained
- Drips come from the inside of the fly, not through the seams
- The inner tent feels dry, but the flysheet is soaked or frosty
- Your gear near the walls is damp, especially where it touched the fabric
- You see beads, mist, or frost forming overnight
- The problem is worse with more people in the tent
If the “leaks” get worse when you shut all vents, that’s another giveaway — you’re trapping moisture, not springing a leak.
Signs it might be a waterproofing or seam issue
While rare, a genuine leak can happen. Look for:
- Water coming through the seams — not forming on the surface
- Drops appear only when it’s raining, not in dry cold conditions
- Persistent wet patches in the same location every time
- A flysheet that feels “sticky,” flaky, or delaminated (coating breakdown)
When to reproof or seam-seal your tent
If you suspect a waterproofing issue:
- Reproof the flysheet when water no longer beads on the surface
- Apply seam sealer to any seams showing signs of wear or peeling tape
- Check guying points and stitching where stress can allow water ingress
Most of the time, though, winter “leaks” are simply condensation doing its thing — which is why ventilation and good campsite selection make such a massive difference.
Conclusion
Condensation might be unavoidable in winter, but it definitely doesn’t have to ruin your camping trip. With the right combination of ventilation, strategic site selection, and a double-wall tent, you can significantly reduce moisture and stay warmer, drier, and more comfortable.
Combine those foundations with the smaller habits — managing wet gear, keeping airflow open, shaking off frost, and avoiding snow buildup — and you’ll be miles ahead of the usual winter condensation struggles.
A little knowledge goes a long way. Once you understand how moisture behaves in cold weather, winter camping becomes less about battling damp kit and more about enjoying the quiet, crisp beauty of the season.
If you’re upgrading your setup for winter, Trekitt has a great range of four-season tents, footprints, and cold-weather accessories designed to help you stay comfortable in the colder months.
Want Some Tent Condensation Tips in Video Form?
If you’d rather watch than read, We’ve put together a handy YouTube video where Paul walks through five simple, general rules for reducing tent condensation.
FAQ
Cold temperatures cause your tent fabric to cool rapidly, so any warm, moist air inside condenses almost instantly when it hits the walls. Snow, frost, and still air also increase humidity around the tent, making winter the perfect environment for heavy condensation.![]()
Keep your sleeping bag away from the tent walls, ventilate the tent from the top, and use a microfibre towel to wipe down moisture before it pools. A double-wall tent helps too, as condensation forms on the flysheet instead of on you.![]()
Not entirely. Four-season tents are stronger and better in snow, but they still experience condensation. What they do offer is improved ventilation, a sturdier flysheet pitch, and features like snow skirts and large vestibules that help manage moisture more effectively.![]()
If you see moisture inside the tent even when it’s not raining, or if droplets appear on the inner fly rather than coming through seams, it’s almost certainly condensation. True leaks are rare and typically appear only during rain, at seams, or where waterproof coatings have worn away.![]()
A footprint helps insulate you from cold, damp ground and protects your tent floor, but it doesn’t stop condensation outright. To get the benefits without trapping humidity, make sure the footprint is slightly smaller than the tent base and the edges aren’t tucked up the sides.![]()
Surprisingly, no — not if you manage it correctly. A small opening at the top of the zipped door releases warm, moist air and actually keeps you warmer by preventing your sleeping bag from getting damp.![]()
Clear, still nights are the worst for condensation. Without wind, moisture has nowhere to escape, and with low temperatures, the tent fabric becomes extremely cold — a perfect surface for condensation or frost to form.![]()
As many as you can while staying comfortable. Use both high and low vents to create a chimney effect — cold air enters low, warm, humid air exits high. Even a small opening on each side can significantly reduce moisture.![]()
Yes. Snow piled against the flysheet blocks airflow and acts like cold insulation, making condensation worse. Clear snow from around the tent, compact your pitch platform, and avoid burying the fly unless winds are extreme.![]()
Only if water stops beading on the flysheet or you notice actual leakage during rain. Condensation alone doesn’t mean your tent needs reproofing. Seam sealing or reproofing is only needed when waterproof coatings wear out.![]()
Absolutely. Each person exhales around a litre of water overnight. More breath = more humidity. Ventilation becomes even more critical in two-person winter setups.![]()
A double-wall tent is the most reliable option. The breathable inner tent keeps you dry, while the flysheet takes on the condensation. Single-wall tents can work in dry alpine conditions, but they’re more prone to dripping in damp UK winters.![]()
Leave a Reply