
Choosing the right winter boots and crampons for UK hills is all about matching boot stiffness, insulation, and crampon compatibility to the specific British terrain and conditions you’ll face most often.
In SHORT…
-
How to choose winter boots for UK hills: Match B1, B2, or B3 boot stiffness to the terrain you hike most — from snowy paths to steeper Scottish winter routes.
-
What defines a winter-ready boot: Look for stiff midsoles, waterproof insulation, and durable construction that withstands the UK’s wet, freeze–thaw conditions.
-
When crampon compatibility matters: Select crampons (C1–C3) after choosing boots to ensure a safe, secure pairing for winter hillwalking or mountaineering.
This article is part of our Winter Gear and Apparel Guide, where you’ll find expert layering advice, technical gear deep dives and practical cold-weather tips.
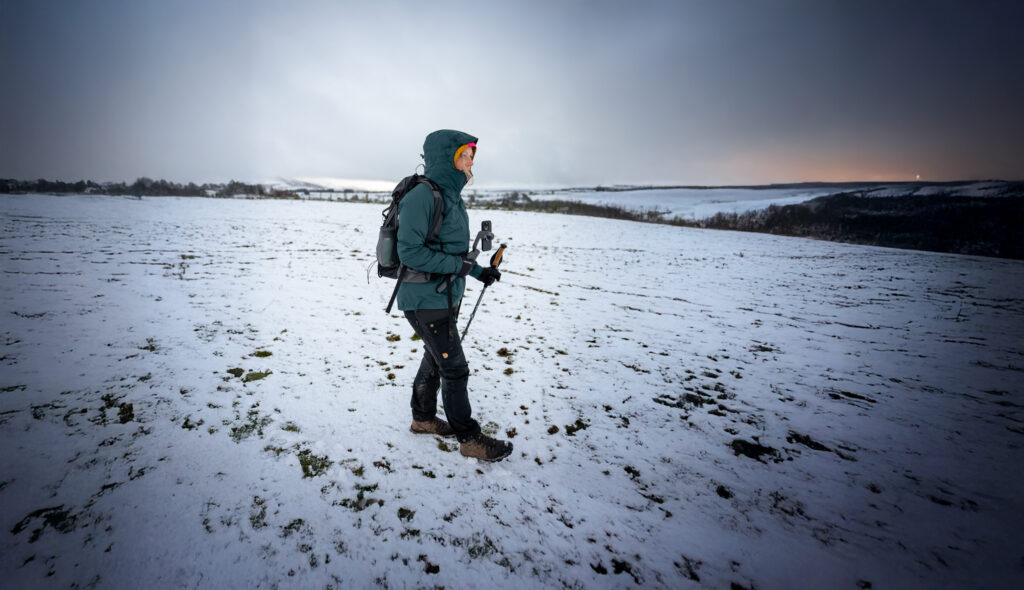
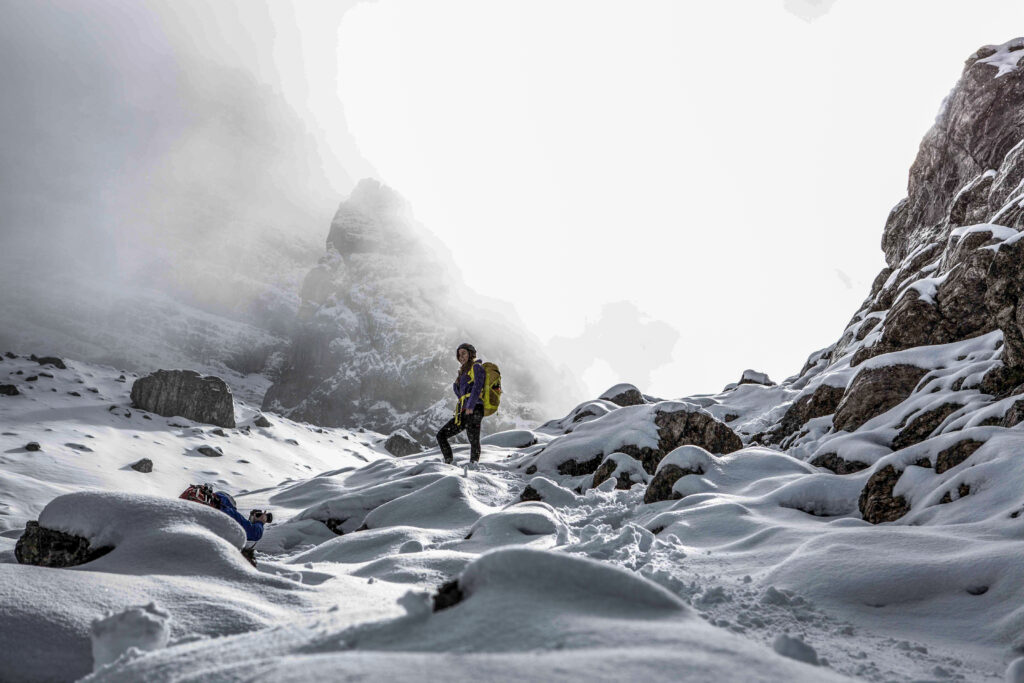
British winters have a mind of their own. One day, the trails are slushy and wet, the next, they’re frozen solid, with hidden patches of ice or ankle-deep snow over rock. Conditions on the UK’s hills can shift within minutes — and when they do, the right footwear makes all the difference between a confident step and a dangerous slip.
That’s why your boots are the foundation of every safe and enjoyable winter adventure. They provide warmth, support, and stability on unpredictable terrain — and when you add crampons, they become your connection to the mountain itself. However, the key is that crampons are only as effective as the boots they’re attached to. Without a solid, stiff platform and a secure fit, even the best crampons won’t perform correctly.
This guide focuses on helping you choose the proper winter boots for UK hills — whether you’re tackling frosty paths in Eryri (Snowdonia) or icy ridges in the Highlands. We’ll explain what makes a boot truly winter-ready, how to find the right balance between comfort and performance, and when it’s worth stepping up to a stiffer model. For the full technical breakdown of boot and crampon ratings (B1–B3, C1–C3) and detailed crampon types, see our complementary Ultimate Guide to Crampons.
Start With the Terrain and Your Goals
Before thinking about stiffness ratings, insulation levels, or crampon compatibility, start by asking one simple question: where are you going, and what kind of terrain will you face?
The environment and your goals should always guide your winter boot choice, not the crampons you already own or what someone else wears. The type of terrain, slope angle, snow depth, and temperature all dictate how much support, stiffness, and warmth you’ll need.
Here’s how to narrow it down:
Occasional Winter Hillwalking on Snowy Paths
If your winter plans revolve around classic, lower-level hillwalks — like the Pyg Track on Yr Wyddfa (Snowdon), the Bannau Brycheiniog (Brecon Beacons), or the Langdale Pikes after a fresh snowfall — you’ll likely be dealing with packed snow, short icy stretches, and wet slush.
For these conditions, look for B1-rated boots. They’re warm, supportive, and firm enough to handle light crampon use without feeling heavy or overbuilt. Paired with C1 crampons, they provide reliable traction and all-day comfort on mixed terrain.
Best for: occasional winter hillwalking, frosty paths, and non-technical peaks.
Example setup: B1 boots with C1 crampons for Wyddfa’s Pyg Track in Winter.
Regular Winter Mountain Routes in Scotland or the Lakes
If you’re out regularly in full winter conditions — traversing steep snowfields, crossing iced-up ridges, or taking on longer days in the Cairngorms, Ben Macdui, or the Central Fells — you’ll need more stiffness and protection.
In this case, go for B2-rated boots. They provide greater sole rigidity for edging and step-kicking, plus more insulation for sub-zero conditions. They’re still comfortable for long approaches but supportive enough for crampon work on steeper ground.
Best for: Scottish Munros, snow-covered ridges, and longer winter routes.
Example setup: B2 boots with C2 crampons for a classic day in the Cairngorms or the Lake District.
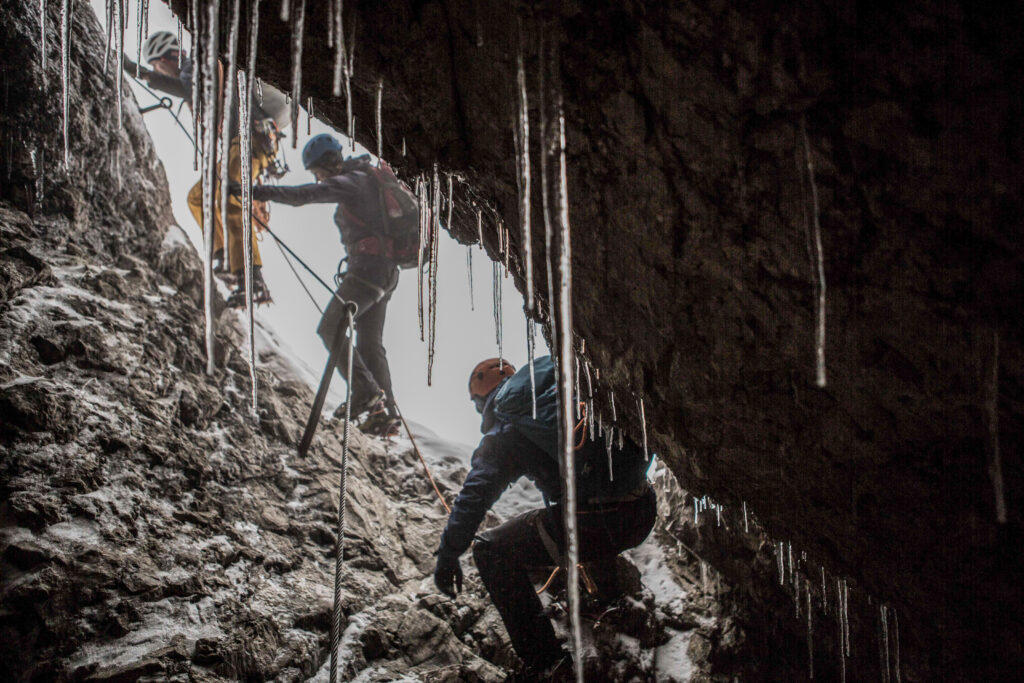
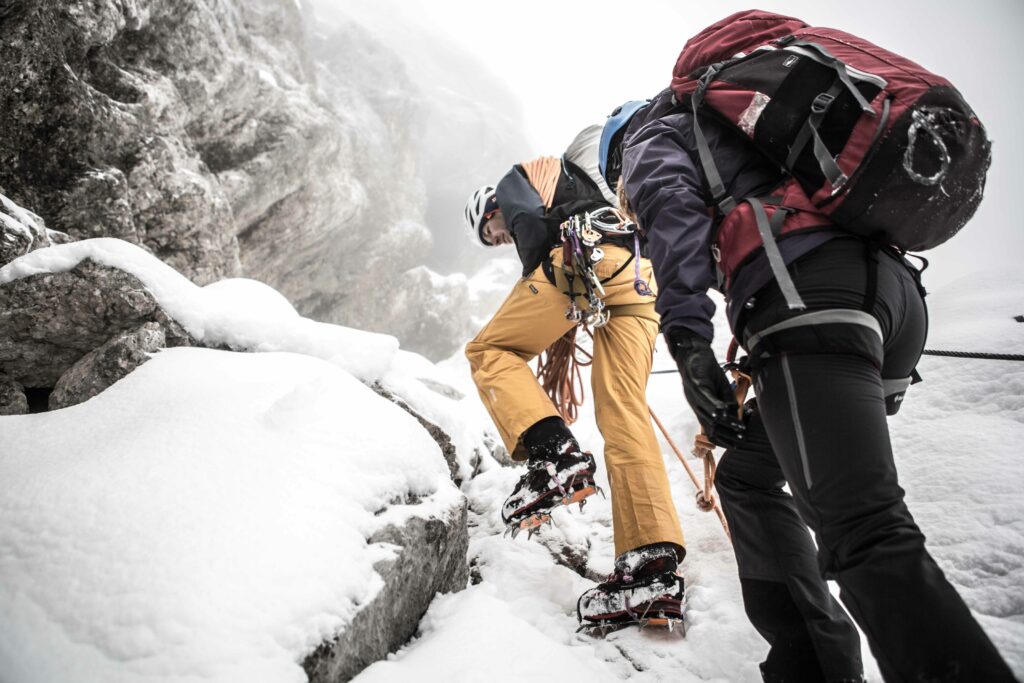
Technical Winter Climbing or Mixed Routes
If your plans involve technical climbing, icy gullies, or mixed snow and rock routes — such as on Ben Nevis, Stob Coire nan Lochan, or in the Alps — your footwear needs to be as tough as the terrain.
B3-rated boots are the go-to choice here. Their fully rigid soles and strong uppers offer maximum precision and security on steep ground. When paired with C3 crampons, they form a solid platform for front-pointing, edging, and vertical movement on ice.
Best for: mountaineering, ice climbing, and mixed routes.
Example setup: B3 boots with C3 crampons for Ben Nevis gullies or technical Scottish routes.
The Golden Rule: Let the Terrain Decide
It’s tempting to think “I’ll buy crampons first and find boots to match,” but that’s the wrong way round. Always choose your boots first, based on the terrain you’ll tackle most often, and then match your crampons to your boots.
A boot that’s too stiff for your needs will feel clunky and exhausting, while one that’s too soft won’t give you the control or safety you need on hard snow. Find that balance — and let your adventures, not your gear, set the standard.
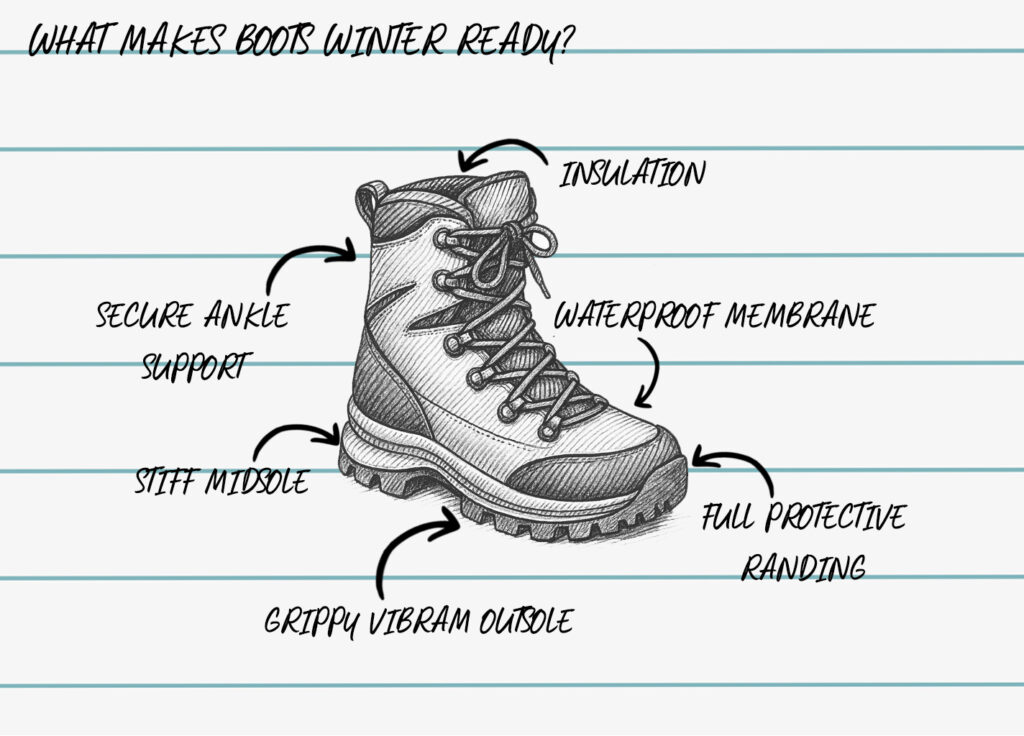
What Makes a Boot ‘Winter-Ready’
A proper winter boot isn’t just a beefed-up version of your three-season pair — it’s purpose-built to handle frozen ground, deep snow, and long, cold days in the hills. Every element, from the sole to the lining, is engineered to protect, support, and perform in sub-zero conditions. Here’s what to look for when choosing boots that can withstand the UK’s demanding winter terrain.
1. A Stiff Midsole for Stability on Frozen Ground
The key difference between a winter boot and a three-season boot lies in stiffness. A stiff midsole prevents your foot from flexing excessively on hard snow or ice, giving you better stability and more confident foot placements. It also ensures even weight distribution when crossing steep slopes or compacted ground.
If you can easily bend your boot in half with your hands, it’s not winter-ready. You want resistance — enough that it feels supportive but not so rigid that walking feels clunky. That stiffness also provides a stable platform for crampon use when needed.
2. Insulation to Keep Feet Warm and Functional
Cold feet aren’t just uncomfortable — they can become dangerous in freezing conditions. Winter boots use built-in insulation layers, such as Gore-Tex Insulated Comfort or Primaloft, to trap warmth and regulate internal temperature.
For the UK, you don’t need extreme expedition insulation. Still, you’ll definitely want a boot that keeps your toes warm in temperatures hovering around zero or below, especially on long days in the snow. Remember: it’s easier to cool down than to warm back up once you’ve lost heat.
3. Waterproof Membranes for Long, Wet Days
UK winters often bring as much rain and slush as they do snow. That’s where a waterproof membrane (like Gore-Tex Insulated Comfort, OutDry, or HDry) comes in. These linings create a barrier against external moisture while allowing sweat vapour to escape, keeping your feet dry from both the outside and inside.
Pair that with treated leather uppers or synthetic reinforcements, and you’ve got a boot that shrugs off wet snow, puddles, and thawing ice.
4. Full Protective Randing for Durability
A rubber rand — the wraparound reinforcement around the base of the boot — might not look exciting, but it’s essential in winter. It protects your boot from crampon abrasion, sharp rocks, and ice, extending its lifespan and keeping water out at critical seams.
If you’re walking in scree or mixed rock-and-ice terrain, a full rand isn’t optional; it’s your first line of defence against scuffs, tears, and delamination.
5. A Grippy Vibram Outsole for Mixed Ground
The outsole of a winter boot should provide reliable traction on everything from frozen turf to wet rock. Most top-tier winter boots use Vibram rubber compounds designed to stay pliable in the cold, with deep, self-cleaning lugs that bite into snow and mud.
Look for soles that blend stability with edge control — you should be able to confidently traverse angled slopes or kick steps into firm snow without losing grip.
6. Secure Ankle Support for Edging and Balance
Winter terrain often means awkward footing, uneven snow cover, and side slopes. A taller, more structured ankle cuff gives you the support and protection you need to stay upright and stable. It also prevents ankle rolls when traversing icy ground or carrying a heavier pack.
This added stiffness around the ankle might feel restrictive at first, but you’ll appreciate it the moment you hit frozen or uneven terrain.
7. Removable Insoles or Liners for Faster Drying
Wet boots are the enemy of multi-day comfort. Removable insoles or liners let you air-dry your boots more effectively after a long, snowy day. It’s a simple feature that makes a big difference — especially when you’re camping or staying in a bothy overnight.
For extra warmth, consider swapping the standard footbed for an insulated or reflective insole designed for cold-weather use.
Trekitt Tip
If your boot flexes easily in your hands, it’s not designed for crampons or hard snow — and it won’t give you the stability you need for winter hills. A true winter boot should feel supportive and robust, ready to tackle the unpredictable mix of snow, rock, and ice that defines the UK’s colder months.
How to Choose the Right Boot Stiffness (Simplified)
Boot stiffness can sound like a technical minefield, but it doesn’t have to be. Instead of memorising every detail of the B-rating system, think of it as a sliding scale — from flexible and comfortable for walking, to completely rigid for climbing. The right choice depends entirely on where you’re going and what kind of terrain you’ll face.
Here’s a quick and practical guide:
If your routes involve short icy sections or compacted paths → Choose B1 Boots
B1 boots are ideal for winter hillwalking and occasional use with crampons. They’re warm, supportive, and have enough flex to walk comfortably over long distances, yet they’re stiff enough to give you a stable platform on hard snow.
Ideal for:
- Yr Wyddfa (Snowdon) or Pen y Fan in winter conditions
- Frozen paths in the Lake District or Peak District
- Occasional days in light snow or ice
Pair with: C1 crampons for simple traction and stability on moderate ground.
If you’re tackling steep snowfields or Scottish Munros → Choose B2 Boots
B2 boots hit the sweet spot between walkability and mountain performance. They’re stiff enough for mountaineering and longer snow routes, but not so rigid that they feel uncomfortable during long approaches. These are the go-to choices for most serious UK winter walkers and climbers.
Ideal for:
- Scottish winter routes and Munro-bagging
- Steep, mixed snow and rock terrain
- Longer mountain days in cold, variable conditions
Pair with: C2 crampons for solid traction and support on steeper slopes.
If you climb technical routes or vertical ice → Choose B3 Boots
B3 boots are the fully rigid, no-compromise option for technical mountaineering, mixed, and ice climbing. They deliver maximum stiffness and crampon security, allowing you to front-point on ice or stand on tiny edges without your sole flexing.
Ideal for:
- Ben Nevis gullies or technical Scottish climbs
- Alpine and high-altitude ascents
- Winter expeditions involving steep or vertical terrain
Pair with: C3 crampons for a precise, locked-in fit.
Trekitt Tip
Think of stiffness like suspension on a bike — softer gives comfort, stiffer gives control. Too much flex makes crampons unstable, too much rigidity makes walking exhausting. Choose the level that matches your terrain and experience, not what looks the most “hardcore.”
For a full explanation of B- and C-rating systems, crampon types, and how they interact, head over to our Ultimate Guide to Crampons — it breaks down everything you need to know about matching boots and crampons safely.
Fit, Comfort, and Sizing Tips for Winter Boots
Getting the right fit for your winter boots is just as important as choosing the right model. Even the most technical, high-performance boot will let you down if it doesn’t fit your foot properly. In winter, when conditions are harsh and every step demands balance and control, a poor fit can mean blisters, numb toes, or even a cut-short day on the hill.
Here’s how to get it right — and what makes winter boot fitting a little different from your usual summer setup.
1. Wear the Right Socks When Trying Boots On
Always try on winter boots with the socks you plan to wear on the hill. That usually means thicker Merino wool or mountaineering-weight socks that provide warmth and cushioning. These socks add noticeable bulk, so wearing them during fitting ensures you get an accurate sense of how much room you’ll need.
Avoid layering multiple socks — it rarely adds warmth and can create friction that leads to blisters. A single, high-quality pair of technical winter socks is all you need.
2. Check for Adequate Toe Room
When walking downhill or kicking into snow, your toes naturally move forward inside the boot. You should have enough space to wiggle your toes, but not so much that your foot slides forward.
Try this simple test:
- Stand upright and tap your toes on the floor — they shouldn’t hit the front.
- Then, walk downhill on a ramp or slope (if available in-store) to ensure your toes don’t jam.
If your toes are pressed against the front of the boot, even slightly, they’ll quickly become painful — and cold — once you’re out in real conditions.
3. Secure Heel Hold = No Blisters
A snug heel hold is crucial for preventing friction and hot spots. Your heel should stay firmly in place when you walk, with minimal up-and-down movement.
You can test this by walking uphill or lifting your heels slightly inside the boot — if you feel lift or rubbing, the fit may be too loose, or the boot may not suit your foot shape. A small amount of movement is fine, but excessive lift will quickly cause discomfort on steep ground.
4. Understand That Winter Boots Fit Differently
Because winter boots have stiffer midsoles and thicker insulation, they won’t flex or “give” like your summer footwear. They may feel firmer or more restrictive at first — this is normal and even beneficial when you’re on snow and ice.
However, that rigidity also means they need careful lacing adjustment. Loosen them slightly during flat approaches to improve comfort, then tighten them securely before tackling steep or icy sections. Many modern boots feature two-zone lacing, allowing you to fine-tune the tension around the forefoot and ankle separately.
5. Try Boots On in the afternoon
Feet naturally swell throughout the day, especially after prolonged periods of walking or standing. Trying boots on in the afternoon gives a more realistic sense of fit — your feet will be slightly larger, mimicking how they’ll feel after several hours on the trail.
This helps avoid ending up with boots that feel perfect in the shop but painfully tight after a few miles of climbing.
6. Match the Boot to Your Foot Shape
Different brands build their boots around different “lasts” — the shape that defines the width and volume of the foot. Knowing this can save you endless trial and error:
- Scarpa – generally suited to narrower or lower-volume feet, offering a precision fit for technical performance.
- Meindl – typically wider-fitting, with more forefoot space and plush comfort, ideal for long days and broader feet.
- La Sportiva often has a technical, close fit with a slightly higher arch, making it great for climbers and scramblers.
- Hanwag tends to offer a medium-to-wide fit with generous toe boxes for added comfort and improved circulation.
Trying on multiple brands helps you feel these differences — and once you find a brand that matches your foot shape, you’ll know where to start next time you upgrade.
Trekitt Tip
A properly fitted winter boot should feel secure but never tight. You should have room to move your toes, a locked-in heel, and consistent pressure across the top of your foot when laced up. If the boot feels instantly comfortable yet stable — that’s a good sign you’ve found your match.
Taking the time to fine-tune your fit will make every snowy ascent, frozen ridge, and long descent far more enjoyable — and keep your feet happy all winter long.
UK-Specific Winter Boot Advice
Winter in the UK is unlike anywhere else. Our mountains might not reach Alpine heights, but they bring their own set of challenges — a relentless mix of cold, wet, rocky, and variable conditions that can change in the space of a few hundred metres. You might start your day in sleet, move through deep, wet snow, and finish on wind-scoured ice. That constant variety makes waterproofing, grip, and durability just as important as insulation or stiffness.
1. It’s Not Just About Cold — It’s About Wet and Rough
Unlike continental winters, the British climate rarely delivers deep, dry snow. Instead, our hills are dominated by freeze-thaw cycles, driving rain, and abrasive, rocky ground. That’s why a well-built, waterproof, and abrasion-resistant boot is essential.
Focus on models with:
- A durable leather or synthetic upper that shrugs off rock and grit.
- A waterproof membrane (like Gore-Tex or OutDry) that stands up to prolonged exposure to slush and puddles.
- A high rubber rand for added protection against scree and crampon wear.
Thick insulation is less critical here — you’re more likely to need waterproof reliability than expedition-level warmth.
2. The Sweet Spot: B1–B2 Boots for Most British Hills
For the majority of winter walkers, a B1 or B2 boot is the perfect match for UK conditions. These categories balance stiffness, warmth, and comfort without overdoing it.
- B1 boots offer enough rigidity for use with flexible C1 crampons, making them ideal for snowy trails, frozen paths, and low-level winter ridges.
- B2 boots provide that extra stiffness and insulation needed for Scottish Munros, steeper routes, and extended snow travel.
This range covers almost everything you’re likely to encounter in the UK — from frosty walks in Snowdonia to challenging winter ascents in Glencoe.
3. Why B3s Are Often Overkill in the UK
B3 boots are incredible for technical ice climbing and alpine ascents, but for most UK walkers, they’re simply too rigid, heavy, and warm. The full-shank design, which makes them stable on vertical ice, also makes them tiring on long, rolling approaches or mixed terrain.
Unless you’re planning technical winter climbing, mixed routes, or high-altitude expeditions abroad, a B3 boot will spend most of its time feeling like overkill on British ground.
4. Tried-and-Tested Models for UK Winter Conditions
At Trekitt, we stock several boots that strike this perfect balance of waterproofing, comfort, and capability — built specifically for the mixed, unpredictable nature of UK winters:
- Scarpa SL Active (B1) – A long-time favourite for four-season hillwalking, with durable leather construction and exceptional support. Ideal for snowy trails and light crampon use.
- Meindl Bhutan MFS (B1) – A trusted four-season classic featuring a durable nubuck leather upper, waterproof Gore-Tex lining, and Meindl’s Memory Foam System for a personalised fit. Its supportive, moderately stiff sole offers reliable performance on snow-covered paths and rough winter terrain, making it ideal for UK hillwalking when paired with C1 crampons.
- La Sportiva Trango Tower GTX (B2) – A lightweight yet robust mountaineering boot that delivers precision and stability on steep ground. Its combination of waterproof Gore-Tex protection, a semi-rigid sole, and excellent ankle support makes it ideal for Scottish winter walking and mixed UK conditions when paired with C2 crampons.
- Scarpa Manta Tech GTX (B2) – A benchmark Scottish winter boot, built for durability and warmth without excessive bulk.
Trekitt Tip
In the UK, durability and weatherproofing matter more than extreme insulation or full rigidity. Choose a boot that feels comfortable on long, wet days but still provides enough stiffness for crampon use when conditions demand it. For most hillwalkers, that means sticking with a B1 or B2 boot — tough, waterproof, and built to handle whatever the British winter throws your way.
Pairing Boots and Crampons — The Quick Version
Getting the right boot-and-crampon pairing is essential for both safety and comfort, but it doesn’t need to be complicated. You’ve already got the full technical deep dive covered in our Ultimate Guide to Crampons — so here’s the quick version to help you make confident decisions without getting lost in the jargon.
The Golden Rule
Your boots determine the crampons, not the other way around.
The stiffness and design of your boots decide which crampon style will fit securely and perform as intended. A crampon that doesn’t match your boot can loosen, slip off, or feel awkward underfoot — none of which you want to discover halfway up a frozen ridge.
At a Glance: Compatibility Guide
| Boot Rating | Compatible Crampons | Best For |
| B0 | Microspikes only | Icy paths, low-level trails |
| B1 | C1 | Winter hillwalking, moderate gradients |
| B2 | C1 or C2 | Scottish winter walking, mountaineering, mixed terrain |
| B3 | C1, C2, or C3 | Technical mountaineering, ice climbing |
Practical Trekitt Advice
- Always test fit before heading out. Even within the same rating, not every boot–crampon combo fits perfectly. Small differences in sole shape or rocker can affect how secure your crampons feel.
- Bring your boots to the shop when buying or adjusting crampons — Trekitt’s specialists can help ensure the bindings fit safely and efficiently.
- Check the fit at home before the trip. Attach your crampons indoors, tighten them properly, and test for movement or gaps. If the fit feels off, adjust the straps or linking bar before you’re standing on a frozen slope.
- Carry a small tool kit or multitool for on-the-hill adjustments — crampons can settle slightly after the first use.
Common Mistakes to Avoid
Choosing winter boots and crampons can feel straightforward — until you’re halfway up an icy ridge and realise something isn’t quite right. Many winter walking mishaps can be traced back to simple gear decisions made in haste or without proper testing. Here are the most common pitfalls to avoid when gearing up for cold-weather adventures.
1. Buying Crampons Before Choosing Boots
This is the number-one mistake. Crampons must fit the shape and stiffness of your boots, not the other way around. Buying crampons first often leads to poor compatibility or unsafe setups — especially if you later choose boots with a different sole profile or welt design.
Trekitt tip: Always start with the right boots for your terrain and then select crampons that match. If possible, bring your boots into the shop so our team can help you with the fit.
2. Assuming One Setup Suits All Conditions
There’s no single boot-and-crampon combo that handles everything from wet, slushy paths to steep, icy gullies. B1/C1 setups are perfect for most UK hillwalking, but they’ll feel out of their depth on technical climbs. Conversely, B3/C3 combinations are brilliant for vertical ice yet exhausting on long, rolling terrain.
Trekitt tip: Match your gear to your most frequent activity, not your most ambitious one. It’s better to have a comfortable, versatile setup you’ll use regularly than a stiff technical pair that rarely leaves the cupboard.
3. Ignoring Fit and Comfort in Favour of Stiffness or Weight Savings
It’s tempting to chase the lightest or most technical option available, but if your boots don’t fit properly, every mile will remind you. Stiff, narrow, or overly tight boots can cause pressure points, numb toes, and blisters — especially in cold weather when circulation is already reduced.
Trekitt tip: Comfort is performance. A well-fitted boot that feels secure and warm will always outperform a stiffer one that causes discomfort after just an hour.
4. Neglecting Gaiter Compatibility and Waterproofing
In the UK, where wet snow and boggy approaches are part of the experience, waterproofing matters as much as grip. Forgetting gaiters or relying solely on your boot’s waterproof membrane often leads to water ingress from above. Once your socks are soaked, warmth and comfort vanish quickly.
Trekitt tip: Choose gaiters that fit snugly over your boots and test them together before your trip. High rubber rands, full-grain leather, and Gore-Tex linings go a long way, but they’re most effective when combined with good gaiter coverage.
5. Not Testing Your Crampons Before Real Use
Don’t wait until you hit steep snow to clip in your crampons for the first time. Each model fits slightly differently, and strap systems or heel levers may require some practice to adjust. Attempting this for the first time on a cold, windy slope is stressful — and potentially unsafe.
Final Thoughts
When it comes to winter in the British hills, the proper boots can make or break your experience. Every step, every ascent, and every confident move across frozen ground depends on what’s beneath your feet. The correct pair of boots will keep you warm, stable, and supported — the wrong pair can turn a day of adventure into a test of endurance.
Safety and comfort start at your feet. Before worrying about crampons, ice axes, or layers, ensure your boots fit perfectly and are suited to the terrain you’ll encounter most often. Prioritise insulation, waterproofing, and support — because once your feet are warm and secure, everything else about winter walking becomes easier, safer, and far more enjoyable.
If you’re unsure which crampons will pair best with your chosen boots, or you’d like to understand how the B/C rating systems work in detail, you’ll find everything you need in our Ultimate Guide to Crampons. It’s packed with visuals, examples, and expert advice to help you build a setup that’s ready for whatever the UK winter throws your way.
FAQ Choosing the Right Winter Boots for UK Hills
Yes, but the level of insulation depends on the type of winter walking you’re doing.
The UK’s cold is usually wet and windy rather than deeply sub-zero, so you don’t need expedition-level insulation. Look for boots with moderate warmth — typically models lined with Gore-Tex Insulated Comfort or Primaloft.
If your routes often include standing around in snow or early-morning starts on frosty summits, insulation makes a big difference to comfort and circulation. On the other hand, for faster-paced winter hikes, excessive insulation can cause your feet to overheat and sweat, leading to damp socks and cold feet later on.
In short, aim for a boot that’s warm, waterproof, and breathable, rather than bulky and over-insulated.![]()
![]()
Winter boots should fit securely but with a touch more space. The extra room allows for thicker socks and improved circulation — both of which are essential to keeping your feet warm.
Toe room: You should be able to wiggle your toes freely without them touching the front.
Heel hold: Your heel should stay locked in place with minimal lift when walking uphill.
Width and volume: Because winter boots are stiffer, ensure there’s no pinching around the instep or ankle.
It’s normal for winter boots to feel firmer underfoot, but they should never feel restrictive. Try them on in the afternoon (when your feet are slightly swollen) and always use the socks you’ll wear on the hill.![]()
Yes — and in the UK, you absolutely should. Snow, slush, and rain have a habit of finding their way into your boots no matter how waterproof they are.
Gaiters add an extra layer of protection by sealing the gap between your boots and trousers, keeping moisture, grit, and debris out. They’re especially useful in deep snow or when crossing boggy ground.
Mountaineering gaiters are designed for winter boots and fasten under the instep with a durable strap and a front lace hook.
Shorter ankle gaiters can work for faster hikes or less extreme conditions.
Boots with integrated gaiters (like some technical La Sportiva models) already have built-in coverage and don’t need extras.![]()
Not necessarily — but conditions in Scotland tend to be colder, windier, and more sustained. If you spend a lot of time on Scottish ridges or gullies, a B2 boot will offer better stiffness and security on steeper terrain.
For Eryri (Snowdonia), the Bannau Brycheiniog (Brecon Beacons), or the Lake District, a B1 boot is usually enough. The terrain is more mixed and often involves long, wet approaches rather than continuous snow or ice.![]()
Good winter boots are an investment, and with the proper care, they’ll last for years:
Clean them after every trip, removing salt, mud, and grit.
Dry them naturally — never on direct heat. Stuff them with newspaper or use boot dryers.
Condition leather uppers with a suitable wax or cream to prevent cracking.
Reproof the membrane every few months to maintain waterproofing.
Store them loosely laced in a cool, dry place away from direct sunlight.
Routine care doesn’t just protect the materials — it also keeps the waterproof membrane working efficiently and the leather supple.![]()
Leave a Reply